Air Intake Modification within the Engine Bay – More Livable Space!
This post contains affiliate links, which means I make a small commission at no extra cost to you. See my full disclosure here
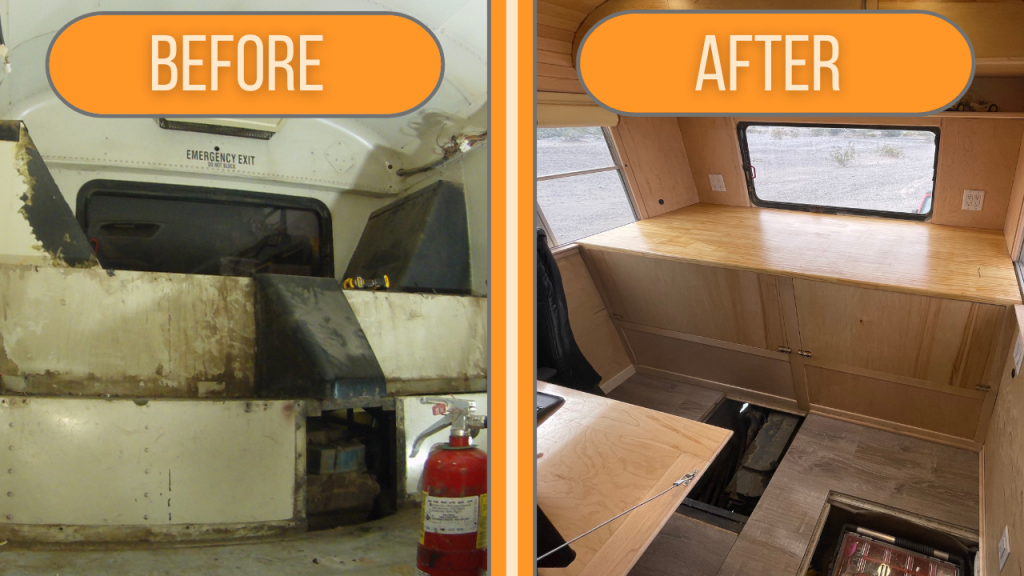
We chose a flat-nosed rear engine bus because of the interior space it provided to our living quarters. However, there was a major obstacle standing between the ideal layout and being forced to put our bed at the rear of the bus to accommodate the air intake cowlings.
As you can see in the “before” picture above, there are two large black plastic cowlings angled on each side of the rear window. These are for the cold air intake. They are necessary for the bus’s functionality and maintaining a cool operating temperature, so rerouting would be necessary.
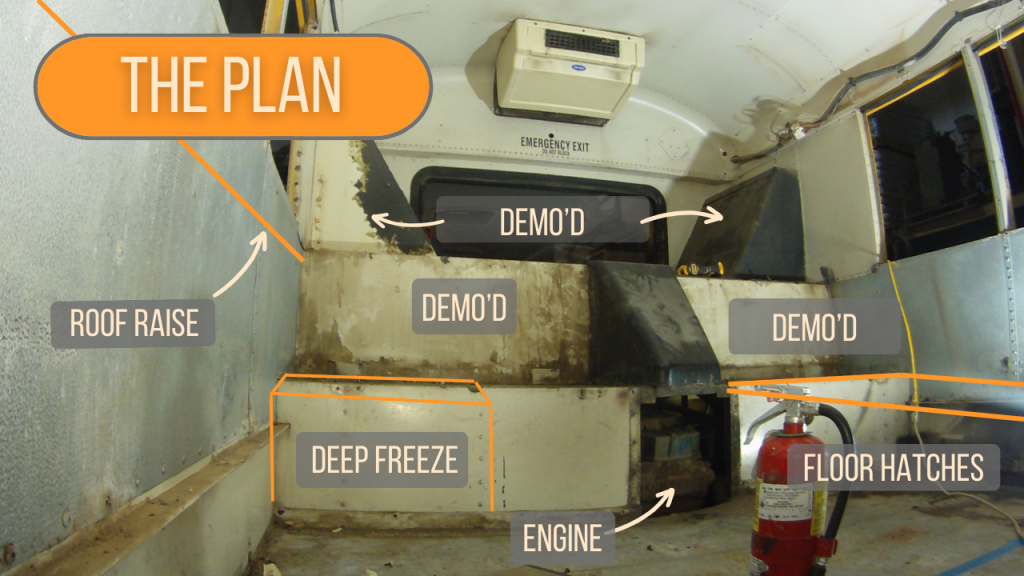
Here’s a blow-up of that “before” picture labeling all the components of the engine bay.

Rerouting the Air Intake
We were able to keep the original air filter housing. With a bit of manipulation, we were able to reuse all the piping and relocate it to be behind the framing for the last bus seat on the driver’s side. In addition, we removed the air management panels from the lower area of the engine bay. Because of the relocated position of the air filter and the removal of the air management panels, it is dustier within the engine bay. This makes the air filter get dirtier faster, especially when driving on non-paved roads.
Metal Framing
We opted to keep the original framing where the back seat is on the driver’s side. Later, our cabin floor-storage framing will be flush with the original back seat framing here. However, we had different plans for the passenger side! On the passenger side, we chose to remove and completely re-frame this framing to work around the engine, providing just enough space for a 5 cubic foot deep-freeze. During our trip to Alaska, this served quite handy for our extra frozen items we needed as we drove on the desolate Alcan and for bringing home lots of salmon!
Another item we chose to demo and replace is the “ceiling” of the engine bay. We chose to make these durable, yet removable panels in case we need to do any mechanical work. These panels would be exposed to the elements so we had to prepare them in a way that they could withstand a lot of varying conditions.
Sound Deadening & Engine Heat
Because the interior framing is adjacent to the engine, we wanted to make sure we thought about how noisy the engine would be. I don’t know about you, but I remember riding the school bus as a child. You nearly had to shout above all the noise of the engine and the other children to be heard.
Another item we wanted to make sure we considered was the heat the engine would produce.
We had a plan to put insulation in the floor and walls of the bus, which would help with sound dampening from the outside, but we didn’t want to have an extruded polystyrene adjacent to the engine. Can you say “fire hazard”?
LizardSkin
Luckily, we were able to solve the noise-dampening and heat from the engine with two simple products! One product is Sound Control, the other is Ceramic Insulation. Both of these products are from LizardSkin. Because we were planning to use both products, LizardSkin recommends applying the sound control prior to the ceramic insulation.
If you want to read more about these products, here is a link to their website!
They also have a page that is even tailored especially to conversions of sprinter vans, which might be worth a look:
https://lizardskin.com/kinds-of-rides/sprinter-vans/
These products were super easy to apply, all we had to do was paint them on. We were able to use an ordinary paintbrush to apply the product. Immediately after applying the sound ceramic, we could tell how well it worked.
Even though the sound deadening worked fabulously, we were still concerned about our deep freeze being directly adjacent to the engine. We were concerned the engine would get extremely hot, causing our freezer to run more than we would like and use extreme amounts of electricity to maintain its temperature. Because of our space constraints in the engine bay near the freezer, we just barely had enough room to install a foam insulation on the inside of our metal framing. However, we wanted to make sure that we weren’t going to excessively heat our freezer, so we opted to try the Ceramic Insulation. After months of traveling, we can conclude that our freezer does not run any more on travel days (when the engine is running) compared to our stationary days, which means that the Ceramic Insulation perfectly fits our needs.
We chose to apply this product on the side of the freezer adjacent to the engine, the back of the rear seat on the drivers side, and the ceiling of our engine bay.
Shop this post:
Here’s a summary:
Original
- Driver’s side back seat metal framing
Modified
- Air intake location
- Air management panels removed
- Air filter location
- Protective coating on all metal framing
- Passenger side back seat metal framing
- LizardSkin for sound deadening and insulation
- Custom ceiling panels in engine bay
Pros
- More interior living space!
- Still have 25 lbs of boost
Cons
- Pulls air from under the bus; filter gets dustier faster
- Warmer air from engine nearby
Check out this video to see everything we modified in our engine bay makeover!


You May Also Like
